I stated at the beginning of the Stagemaster Project that this blog would have a beginning and an end, and I guess this is the end. The Stagemaster is all back together and I have been playing the heck out of it. I have to say, without exaggeration, that it is the most beautiful sounding guitar I have ever owned.
What did I learn? Lots, and a lot more than I cared to learn regarding electronics. But if I had to stress the importance of one particular item, it would be shielding. I just cannot say this enough . . . if you are going to hot rod an electric guitar, I advise you to shield the electronics properly. I have owned several electric guitars over the years, including a Strat and a Les Paul, and they all made noise. Hum, buzz, feedback, microphonics, whatever. To varying degrees, every one of them made some type of annoying noise.
This Stagemaster, because of the pains I took to research how to properly shield electronics, makes no extraneous noise of any type whatsoever. I can crank it up to ear splitting volume levels, and there is no hum, no buzz, no feedback or anything else. The only sounds this guitar makes is pure, sweet electric guitar sounds. The total lack of electronic hum and buzz really takes some getting used to. A new experience for me.
And finally, I would like to thank those of you who have followed this blog from beginning to end. I know this is a highly specialized topic and not for everyone, but I know there are a handful of you out there who have read the whole thing, and I appreciated your kind words and encouragement when the going got tough. I felt like throwing the whole thing in the garbage on several occasions.
So I guess that's about it for this blog. If you would like to drop me a line from time to time, please do so. I'd like to hear from you.
Take care and keep playing those electric guitars.
Crispy
Monday, March 27, 2006
What Did It Cost?
Well I've collected all the receipts for the Stagemaster Project and it, of course, cost a lot more than I thought it was going to (the story of my life). Here is the breakdown:
1 Fender 5-way Superswitch - $21.80
1 DiMarzio DP213F pickup - $59.99
1 DiMarzio DP103 pickup - $59.99
1 DiMarzio DP217 pickup - $59.99
1 Strat Knob Set (black) - $6.99
1 Strat Switch Knob (black) - $3.99
1 Fender Standard 5-way Switch (not used) - $11.99
2 Gibson 500K Pots - $13.98
2 Fender 250K Pots (not used) - $9.90
2 Sheets Copper Foil - $20.00
1 Custom made Tortoise Pickguard - $80.00
Which comes to, I believe, an astounding $348.62! This is slightly more than I paid for the Stagemaster in the first place. So if any of you out there are contemplating a major overhaul like this one, be prepared for the costs to add up when you start buying quality parts.
Crispy
Friday, March 17, 2006
DiMarzio Responds
I had some time today so I thought I would drop DiMarzio a line explaining the problem with their wiring diagram. Be aware that their web site is not very user-friendly regarding tech support. Here is the exchange:
Me:
For your information, the wiring diagram PDF you have on your web site for the humbucker-single-humbucker (hum canceling) set up, is wrong and cannot work per your instructions. I am attaching an image to this e-mail that illustrates the error. The red and green wires in your diagram (indicated with blue arrows) are reversed and cannot work like that.
Thank you.
DiMarzio Tech:
Sorry, but you are incorrect. The diagram works perfectly well when used with the types pf pickups called for in the text. We have used it at our shop, and several guitar builders use it on their instruments.
Me:
The types of pickups make a difference? Don't they all have the same number of wires and colors of wires? All of my pickups are brand new DiMarizios and if wired according to your diagram, the bridge pickup does not work when the 5-way switch is in postions 4 and 5.
I think you are incorrect.
DiMarzio Tech (Steve Blucher):
Sorry, but I am not incorrect. We should be able to sort this out if you can tell us which pickups you have.
Me:
I have a DP103, a DP213F and a DP217, all brand new. Yes, please enlighten me. I am anxious to see how, with these pickups, you can make the bridge pickup work using your wiring diagram. The only way I could make it work was to swap the red and green wire connections for the bridge pickup.
DiMarzio Tech (Steve Blucher):
The diagram on the website calls for 2 standard humbuckers in the neck and bridge positions and a Virtual Vintage-style Strat-size pickup in the middle. The middle pickup has opposite polarity from the humbuckers, hence the color code in the diagram. Your setup has 3 standard humbuckers, for which the correct wiring diagram is attached above.
Me:
The DP217 is not a humbucker, is it?
DiMarzio Tech (Steve Blucher):
The DP217 is a stacked, humcancelling Strat-size pickup. If it is installed in the middle position, the diagram on the website shows the correct wiring. A different diagram is called for if it is not.
Me:
Then we disagree, I guess. It is definitely installed in the middle position and I had to swap the red and green wires on the bridge humbucker to get it to work. I know nothing of electronics; however, I am very good at following instructions and diagrams. After I installed my pickups and wired them up according to your diagram (precisely), the bridge position pickup did
nothing in switch positions 4 and 5. It worked only after I swapped the wires.
DiMarzio Tech:
All of our humbuckers are magnetized in the same direction (unless specified otherwise by the individual customer), so if the wiring functions correctly in positions 1&2 (neck & middle) it should function similarly in 4&5. The only possibility I can easily envision is that the bridge pickup was incorrectly magnetized in the wrong direction.
Me:
Well thank you for your time and I guess this issue will have to remain a mystery. And for whatever it's worth, after I swapped the wires and got the bridge pickup working, the guitar sounds fabulous. The pickups sound beautiful both singly and in combination with each other.
This has to be the best sounding arrangement of pickups that I have ever had. The DiMarzios completely exceeded my expectations.
DiMarzio Tech:
The mystery could be solved by returning the bridge pickup to us. You could also check the polarity of the humbuckers by holding a compass over the polepieces. The poles on the coil located over the cable exits on both pickups should read south.
Me:
Thanks, but the only way I would return pickup is if I had a replacement in hand. I have no intention of being without my guitar any longer than I already have been while fiddling with and researching this installation hassle. Not knowing anything about electronics I solved this installation issue by trial and error and it almost drove me nuts!
If you would care to send me a replacement I would be happy to send this pickup back to you with the receipt and original packing materials. The pickup was purchased at the Guitar Center in Tampa, FL in January or February, I think.
If you can't send me a replacement in advance, I'll make do with it the current pickup wrongly magnetized, or whatever. By the way, I don't have a compass readily available so I can't check the polarity.
DiMarzio Tech:
If the diagnosis is correct, there is no reason to disassemble the guitar and return the pickup to us, since its performance is not negatively affected by having reverse polarity. In hindsight, it might have saved you some time (and sanity) if you had contacted us as soon as you encountered the problem.
Me:
I had considered contacting you, but I wasn't confident of a solution based on your web site's "Contact" page. The "Technical Support" link merely goes to a series of FAQs that didn't help, and I wasn't sure the "General Info" was for--web site issues or technical issues. I sent my comments to "General Info" on a whim and as a courtesy.
Anyway, I don't know how common wrongly magnetized pickups are, but if it is something you produce fairly often, you may want to mention it in your installation docs.
Michael Altilio (DiMarzio):
Your question will be answered by one of our techs, but I wanted to comment on a side issue. The Contact Tech Support function on the website takes you to the FAQ page, which answers many questions without contacting us. The final option on the FAQ page is "Ask a question", where you are prompted to email us. Perhaps this isn't as obvious as we would like it to be.
We often make pickups with reverse polarity at the customer's request for special switching configurations. It's possible that there was a mixup where we put a reverse magnet pickup in standard packaging.
The good news is that your problem is solved. Sorry for the grief.
Me:
For your information, the wiring diagram PDF you have on your web site for the humbucker-single-humbucker (hum canceling) set up, is wrong and cannot work per your instructions. I am attaching an image to this e-mail that illustrates the error. The red and green wires in your diagram (indicated with blue arrows) are reversed and cannot work like that.
Thank you.
DiMarzio Tech:
Sorry, but you are incorrect. The diagram works perfectly well when used with the types pf pickups called for in the text. We have used it at our shop, and several guitar builders use it on their instruments.
Me:
The types of pickups make a difference? Don't they all have the same number of wires and colors of wires? All of my pickups are brand new DiMarizios and if wired according to your diagram, the bridge pickup does not work when the 5-way switch is in postions 4 and 5.
I think you are incorrect.
DiMarzio Tech (Steve Blucher):
Sorry, but I am not incorrect. We should be able to sort this out if you can tell us which pickups you have.
Me:
I have a DP103, a DP213F and a DP217, all brand new. Yes, please enlighten me. I am anxious to see how, with these pickups, you can make the bridge pickup work using your wiring diagram. The only way I could make it work was to swap the red and green wire connections for the bridge pickup.
DiMarzio Tech (Steve Blucher):
The diagram on the website calls for 2 standard humbuckers in the neck and bridge positions and a Virtual Vintage-style Strat-size pickup in the middle. The middle pickup has opposite polarity from the humbuckers, hence the color code in the diagram. Your setup has 3 standard humbuckers, for which the correct wiring diagram is attached above.
Me:
The DP217 is not a humbucker, is it?
DiMarzio Tech (Steve Blucher):
The DP217 is a stacked, humcancelling Strat-size pickup. If it is installed in the middle position, the diagram on the website shows the correct wiring. A different diagram is called for if it is not.
Me:
Then we disagree, I guess. It is definitely installed in the middle position and I had to swap the red and green wires on the bridge humbucker to get it to work. I know nothing of electronics; however, I am very good at following instructions and diagrams. After I installed my pickups and wired them up according to your diagram (precisely), the bridge position pickup did
nothing in switch positions 4 and 5. It worked only after I swapped the wires.
DiMarzio Tech:
All of our humbuckers are magnetized in the same direction (unless specified otherwise by the individual customer), so if the wiring functions correctly in positions 1&2 (neck & middle) it should function similarly in 4&5. The only possibility I can easily envision is that the bridge pickup was incorrectly magnetized in the wrong direction.
Me:
Well thank you for your time and I guess this issue will have to remain a mystery. And for whatever it's worth, after I swapped the wires and got the bridge pickup working, the guitar sounds fabulous. The pickups sound beautiful both singly and in combination with each other.
This has to be the best sounding arrangement of pickups that I have ever had. The DiMarzios completely exceeded my expectations.
DiMarzio Tech:
The mystery could be solved by returning the bridge pickup to us. You could also check the polarity of the humbuckers by holding a compass over the polepieces. The poles on the coil located over the cable exits on both pickups should read south.
Me:
Thanks, but the only way I would return pickup is if I had a replacement in hand. I have no intention of being without my guitar any longer than I already have been while fiddling with and researching this installation hassle. Not knowing anything about electronics I solved this installation issue by trial and error and it almost drove me nuts!
If you would care to send me a replacement I would be happy to send this pickup back to you with the receipt and original packing materials. The pickup was purchased at the Guitar Center in Tampa, FL in January or February, I think.
If you can't send me a replacement in advance, I'll make do with it the current pickup wrongly magnetized, or whatever. By the way, I don't have a compass readily available so I can't check the polarity.
DiMarzio Tech:
If the diagnosis is correct, there is no reason to disassemble the guitar and return the pickup to us, since its performance is not negatively affected by having reverse polarity. In hindsight, it might have saved you some time (and sanity) if you had contacted us as soon as you encountered the problem.
Me:
I had considered contacting you, but I wasn't confident of a solution based on your web site's "Contact" page. The "Technical Support" link merely goes to a series of FAQs that didn't help, and I wasn't sure the "General Info" was for--web site issues or technical issues. I sent my comments to "General Info" on a whim and as a courtesy.
Anyway, I don't know how common wrongly magnetized pickups are, but if it is something you produce fairly often, you may want to mention it in your installation docs.
Michael Altilio (DiMarzio):
Your question will be answered by one of our techs, but I wanted to comment on a side issue. The Contact Tech Support function on the website takes you to the FAQ page, which answers many questions without contacting us. The final option on the FAQ page is "Ask a question", where you are prompted to email us. Perhaps this isn't as obvious as we would like it to be.
We often make pickups with reverse polarity at the customer's request for special switching configurations. It's possible that there was a mixup where we put a reverse magnet pickup in standard packaging.
The good news is that your problem is solved. Sorry for the grief.
Thursday, March 16, 2006
DiMarzio is Wrong!
 As I explained in my previous post, there was one final headache involved in completing this project, and it is DiMarzio's fault. Please take a look at the 2 illustrations, and keep in mind I am no technical writer.
The red box in Fig. 1 is an area I would like to bring your attention to and more specifically, to where the bridge pickup connects to the 5 way switch and volume pot.
Fig. 2 is a "blow up" of this area. The problem with DiMarzio's schematic is that the red and green wires are reversed. I have indicated the "reversed" wires with blue arrows.
If this is wired up per DiMarzio's instructions, the bridge pickup will not work at all. I suspected something was wrong with DiMarzio's diagram and my suspicions were confirmed when I had an electronics guy check it out for me.
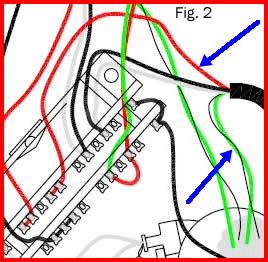
Connected per DiMarzio's instructions, the bridge pickup will not work with the 5-way switch in either position 4 or 5.
To correctly wire this up, the green wire goes to the 5-way switch and red wire is grounded to the volume pot housing. The "ass-backwards" red and green wires threw me off and caused a lot of experimenting where none was needed had the schematic been correct.
I am considering writing a letter to DiMarzio regarding this incorrect schematic. Maybe I can save some other chump out there some aggravation.
Crispy
Wednesday, March 15, 2006
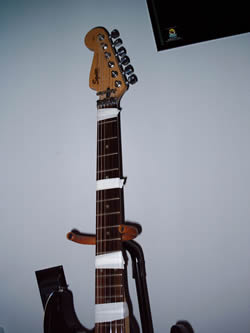
The Final Product
 The Stagemaster is finished, and here it is. Isn't she beautiful? I had time today to put it all back together and I'm happy to say it went off without a hitch--which is not to say that there wasn't a final hitch regarding the electronics. But please allow me to describe the bad parts in a later post.
What I would like to do today is enjoy the moment. The Stagemaster is back together and it sounds . . . well, it sounds like I hoped it would. What more could I ask for, really? I expected and hoped it would sound a certain way, and it has exceeded my expectations.
The new DiMarzio pickups sound sublimely beautiful singly, and in combination with one another. The neck position pickup is a powerhouse with a huge, big fat sound and the single coil in the middle position is as clean sounding of a pickup that I have ever heard.
But the main feature, it turns out, is the f-spaced pickup in the bridge position. This is an ass-kicking pickup that almost sounds like it has an overdrive built in. The power is indescribable.
And finally, the shielding. Going to the trouble of shielding the electronics properly has paid off in a big way. I have never owned a guitar, until now, that is completely noise free. No hum, no buzz no nothing. Complete, beautiful silence.
So what is left to do? Nothing as far as the Stagemaster goes, but what I would like to do for you is to summarize the project in the next series of posts. There were several mystifying developments at the end of the project which you should be aware of if you try something like this on your own. I will describe these to you in detail.
I would also like to summarize what this project cost. I have a feeling that it may have cost more than the guitar itself cost, but we'll see. I haven't added it up yet.
But for now, the Stagemaster is done and I am enjoying my "new" guitar.
Crispy
Friday, March 10, 2006
Big News!
A lot of new news coming soon regarding the Stagemaster project. DiMarzio's wiring diagram is wrong! Wrong I tell you! More on this soon.
Crispy!
Crispy!
Saturday, March 04, 2006
Galactic Purple on eBay
 I'm not a huge fan of the color purple, but look what I found for sale on eBay. It is the Galactic Purple version of the Stagemaster and there are some good photos of it on eBay, just click on the photo to go to the sale (sale expired, link removed). Now this is purple!
Please note that it is described on eBay as a "Squire Stagemaster Stratocaster by Fender," which is incorrect. For one, it is not a Stratocaster at all, and Squier is misspelled.
I would like to know where they got that hardshell case. I may have to drop them a line.
Crispy
The Work Continues
 I finally had some time this morning to take the Stagemaster back apart. I didn't want to trash the brand new set of strings I put on so I had to figure out a way to avoid taking them completely off, and this is what I came up with.
All I did was unlock the "locking nut" and loosened the strings until they were real baggy. Then I taped them to the neck with some masking tape as shown where they would stay put and not get bent up. Then it was a simple matter of releasing the strings from the Floyd Rose bridge.
I removed the pickguard again, for the umpteenth time, and unsoldered all of the connections to the two 250k pots and installed the Gibson 500k pots that I bought earlier. I had to ream out the holes in the pickguard just a tad to get the Gibson pots to fit, but they are now mounted on the pickguard.
That's about as far as I got today. All I have to do is reconnect everything to the new pots and I should be finally good to go (crossing fingers). Unfortunately, this is no small job. There is a lot of soldering and reconnecting still to be done.
Crispy
Subscribe to:
Posts (Atom)
