I stated at the beginning of the Stagemaster Project that this blog would have a beginning and an end, and I guess this is the end. The Stagemaster is all back together and I have been playing the heck out of it. I have to say, without exaggeration, that it is the most beautiful sounding guitar I have ever owned.
What did I learn? Lots, and a lot more than I cared to learn regarding electronics. But if I had to stress the importance of one particular item, it would be shielding. I just cannot say this enough . . . if you are going to hot rod an electric guitar, I advise you to shield the electronics properly. I have owned several electric guitars over the years, including a Strat and a Les Paul, and they all made noise. Hum, buzz, feedback, microphonics, whatever. To varying degrees, every one of them made some type of annoying noise.
This Stagemaster, because of the pains I took to research how to properly shield electronics, makes no extraneous noise of any type whatsoever. I can crank it up to ear splitting volume levels, and there is no hum, no buzz, no feedback or anything else. The only sounds this guitar makes is pure, sweet electric guitar sounds. The total lack of electronic hum and buzz really takes some getting used to. A new experience for me.
And finally, I would like to thank those of you who have followed this blog from beginning to end. I know this is a highly specialized topic and not for everyone, but I know there are a handful of you out there who have read the whole thing, and I appreciated your kind words and encouragement when the going got tough. I felt like throwing the whole thing in the garbage on several occasions.
So I guess that's about it for this blog. If you would like to drop me a line from time to time, please do so. I'd like to hear from you.
Take care and keep playing those electric guitars.
Crispy
Monday, March 27, 2006

What Did It Cost?
Well I've collected all the receipts for the Stagemaster Project and it, of course, cost a lot more than I thought it was going to (the story of my life). Here is the breakdown:
1 Fender 5-way Superswitch - $21.80
1 DiMarzio DP213F pickup - $59.99
1 DiMarzio DP103 pickup - $59.99
1 DiMarzio DP217 pickup - $59.99
1 Strat Knob Set (black) - $6.99
1 Strat Switch Knob (black) - $3.99
1 Fender Standard 5-way Switch (not used) - $11.99
2 Gibson 500K Pots - $13.98
2 Fender 250K Pots (not used) - $9.90
2 Sheets Copper Foil - $20.00
1 Custom made Tortoise Pickguard - $80.00
Which comes to, I believe, an astounding $348.62! This is slightly more than I paid for the Stagemaster in the first place. So if any of you out there are contemplating a major overhaul like this one, be prepared for the costs to add up when you start buying quality parts.
Crispy
1 Fender 5-way Superswitch - $21.80
1 DiMarzio DP213F pickup - $59.99
1 DiMarzio DP103 pickup - $59.99
1 DiMarzio DP217 pickup - $59.99
1 Strat Knob Set (black) - $6.99
1 Strat Switch Knob (black) - $3.99
1 Fender Standard 5-way Switch (not used) - $11.99
2 Gibson 500K Pots - $13.98
2 Fender 250K Pots (not used) - $9.90
2 Sheets Copper Foil - $20.00
1 Custom made Tortoise Pickguard - $80.00
Which comes to, I believe, an astounding $348.62! This is slightly more than I paid for the Stagemaster in the first place. So if any of you out there are contemplating a major overhaul like this one, be prepared for the costs to add up when you start buying quality parts.
Crispy
Friday, March 17, 2006
DiMarzio Responds
I had some time today so I thought I would drop DiMarzio a line explaining the problem with their wiring diagram. Be aware that their web site is not very user-friendly regarding tech support. Here is the exchange:
Me:
For your information, the wiring diagram PDF you have on your web site for the humbucker-single-humbucker (hum canceling) set up, is wrong and cannot work per your instructions. I am attaching an image to this e-mail that illustrates the error. The red and green wires in your diagram (indicated with blue arrows) are reversed and cannot work like that.
Thank you.
DiMarzio Tech:
Sorry, but you are incorrect. The diagram works perfectly well when used with the types pf pickups called for in the text. We have used it at our shop, and several guitar builders use it on their instruments.
Me:
The types of pickups make a difference? Don't they all have the same number of wires and colors of wires? All of my pickups are brand new DiMarizios and if wired according to your diagram, the bridge pickup does not work when the 5-way switch is in postions 4 and 5.
I think you are incorrect.
DiMarzio Tech (Steve Blucher):
Sorry, but I am not incorrect. We should be able to sort this out if you can tell us which pickups you have.
Me:
I have a DP103, a DP213F and a DP217, all brand new. Yes, please enlighten me. I am anxious to see how, with these pickups, you can make the bridge pickup work using your wiring diagram. The only way I could make it work was to swap the red and green wire connections for the bridge pickup.
DiMarzio Tech (Steve Blucher):
The diagram on the website calls for 2 standard humbuckers in the neck and bridge positions and a Virtual Vintage-style Strat-size pickup in the middle. The middle pickup has opposite polarity from the humbuckers, hence the color code in the diagram. Your setup has 3 standard humbuckers, for which the correct wiring diagram is attached above.
Me:
The DP217 is not a humbucker, is it?
DiMarzio Tech (Steve Blucher):
The DP217 is a stacked, humcancelling Strat-size pickup. If it is installed in the middle position, the diagram on the website shows the correct wiring. A different diagram is called for if it is not.
Me:
Then we disagree, I guess. It is definitely installed in the middle position and I had to swap the red and green wires on the bridge humbucker to get it to work. I know nothing of electronics; however, I am very good at following instructions and diagrams. After I installed my pickups and wired them up according to your diagram (precisely), the bridge position pickup did
nothing in switch positions 4 and 5. It worked only after I swapped the wires.
DiMarzio Tech:
All of our humbuckers are magnetized in the same direction (unless specified otherwise by the individual customer), so if the wiring functions correctly in positions 1&2 (neck & middle) it should function similarly in 4&5. The only possibility I can easily envision is that the bridge pickup was incorrectly magnetized in the wrong direction.
Me:
Well thank you for your time and I guess this issue will have to remain a mystery. And for whatever it's worth, after I swapped the wires and got the bridge pickup working, the guitar sounds fabulous. The pickups sound beautiful both singly and in combination with each other.
This has to be the best sounding arrangement of pickups that I have ever had. The DiMarzios completely exceeded my expectations.
DiMarzio Tech:
The mystery could be solved by returning the bridge pickup to us. You could also check the polarity of the humbuckers by holding a compass over the polepieces. The poles on the coil located over the cable exits on both pickups should read south.
Me:
Thanks, but the only way I would return pickup is if I had a replacement in hand. I have no intention of being without my guitar any longer than I already have been while fiddling with and researching this installation hassle. Not knowing anything about electronics I solved this installation issue by trial and error and it almost drove me nuts!
If you would care to send me a replacement I would be happy to send this pickup back to you with the receipt and original packing materials. The pickup was purchased at the Guitar Center in Tampa, FL in January or February, I think.
If you can't send me a replacement in advance, I'll make do with it the current pickup wrongly magnetized, or whatever. By the way, I don't have a compass readily available so I can't check the polarity.
DiMarzio Tech:
If the diagnosis is correct, there is no reason to disassemble the guitar and return the pickup to us, since its performance is not negatively affected by having reverse polarity. In hindsight, it might have saved you some time (and sanity) if you had contacted us as soon as you encountered the problem.
Me:
I had considered contacting you, but I wasn't confident of a solution based on your web site's "Contact" page. The "Technical Support" link merely goes to a series of FAQs that didn't help, and I wasn't sure the "General Info" was for--web site issues or technical issues. I sent my comments to "General Info" on a whim and as a courtesy.
Anyway, I don't know how common wrongly magnetized pickups are, but if it is something you produce fairly often, you may want to mention it in your installation docs.
Michael Altilio (DiMarzio):
Your question will be answered by one of our techs, but I wanted to comment on a side issue. The Contact Tech Support function on the website takes you to the FAQ page, which answers many questions without contacting us. The final option on the FAQ page is "Ask a question", where you are prompted to email us. Perhaps this isn't as obvious as we would like it to be.
We often make pickups with reverse polarity at the customer's request for special switching configurations. It's possible that there was a mixup where we put a reverse magnet pickup in standard packaging.
The good news is that your problem is solved. Sorry for the grief.
Me:
For your information, the wiring diagram PDF you have on your web site for the humbucker-single-humbucker (hum canceling) set up, is wrong and cannot work per your instructions. I am attaching an image to this e-mail that illustrates the error. The red and green wires in your diagram (indicated with blue arrows) are reversed and cannot work like that.
Thank you.
DiMarzio Tech:
Sorry, but you are incorrect. The diagram works perfectly well when used with the types pf pickups called for in the text. We have used it at our shop, and several guitar builders use it on their instruments.
Me:
The types of pickups make a difference? Don't they all have the same number of wires and colors of wires? All of my pickups are brand new DiMarizios and if wired according to your diagram, the bridge pickup does not work when the 5-way switch is in postions 4 and 5.
I think you are incorrect.
DiMarzio Tech (Steve Blucher):
Sorry, but I am not incorrect. We should be able to sort this out if you can tell us which pickups you have.
Me:
I have a DP103, a DP213F and a DP217, all brand new. Yes, please enlighten me. I am anxious to see how, with these pickups, you can make the bridge pickup work using your wiring diagram. The only way I could make it work was to swap the red and green wire connections for the bridge pickup.
DiMarzio Tech (Steve Blucher):
The diagram on the website calls for 2 standard humbuckers in the neck and bridge positions and a Virtual Vintage-style Strat-size pickup in the middle. The middle pickup has opposite polarity from the humbuckers, hence the color code in the diagram. Your setup has 3 standard humbuckers, for which the correct wiring diagram is attached above.
Me:
The DP217 is not a humbucker, is it?
DiMarzio Tech (Steve Blucher):
The DP217 is a stacked, humcancelling Strat-size pickup. If it is installed in the middle position, the diagram on the website shows the correct wiring. A different diagram is called for if it is not.
Me:
Then we disagree, I guess. It is definitely installed in the middle position and I had to swap the red and green wires on the bridge humbucker to get it to work. I know nothing of electronics; however, I am very good at following instructions and diagrams. After I installed my pickups and wired them up according to your diagram (precisely), the bridge position pickup did
nothing in switch positions 4 and 5. It worked only after I swapped the wires.
DiMarzio Tech:
All of our humbuckers are magnetized in the same direction (unless specified otherwise by the individual customer), so if the wiring functions correctly in positions 1&2 (neck & middle) it should function similarly in 4&5. The only possibility I can easily envision is that the bridge pickup was incorrectly magnetized in the wrong direction.
Me:
Well thank you for your time and I guess this issue will have to remain a mystery. And for whatever it's worth, after I swapped the wires and got the bridge pickup working, the guitar sounds fabulous. The pickups sound beautiful both singly and in combination with each other.
This has to be the best sounding arrangement of pickups that I have ever had. The DiMarzios completely exceeded my expectations.
DiMarzio Tech:
The mystery could be solved by returning the bridge pickup to us. You could also check the polarity of the humbuckers by holding a compass over the polepieces. The poles on the coil located over the cable exits on both pickups should read south.
Me:
Thanks, but the only way I would return pickup is if I had a replacement in hand. I have no intention of being without my guitar any longer than I already have been while fiddling with and researching this installation hassle. Not knowing anything about electronics I solved this installation issue by trial and error and it almost drove me nuts!
If you would care to send me a replacement I would be happy to send this pickup back to you with the receipt and original packing materials. The pickup was purchased at the Guitar Center in Tampa, FL in January or February, I think.
If you can't send me a replacement in advance, I'll make do with it the current pickup wrongly magnetized, or whatever. By the way, I don't have a compass readily available so I can't check the polarity.
DiMarzio Tech:
If the diagnosis is correct, there is no reason to disassemble the guitar and return the pickup to us, since its performance is not negatively affected by having reverse polarity. In hindsight, it might have saved you some time (and sanity) if you had contacted us as soon as you encountered the problem.
Me:
I had considered contacting you, but I wasn't confident of a solution based on your web site's "Contact" page. The "Technical Support" link merely goes to a series of FAQs that didn't help, and I wasn't sure the "General Info" was for--web site issues or technical issues. I sent my comments to "General Info" on a whim and as a courtesy.
Anyway, I don't know how common wrongly magnetized pickups are, but if it is something you produce fairly often, you may want to mention it in your installation docs.
Michael Altilio (DiMarzio):
Your question will be answered by one of our techs, but I wanted to comment on a side issue. The Contact Tech Support function on the website takes you to the FAQ page, which answers many questions without contacting us. The final option on the FAQ page is "Ask a question", where you are prompted to email us. Perhaps this isn't as obvious as we would like it to be.
We often make pickups with reverse polarity at the customer's request for special switching configurations. It's possible that there was a mixup where we put a reverse magnet pickup in standard packaging.
The good news is that your problem is solved. Sorry for the grief.
Thursday, March 16, 2006
DiMarzio is Wrong!
 As I explained in my previous post, there was one final headache involved in completing this project, and it is DiMarzio's fault. Please take a look at the 2 illustrations, and keep in mind I am no technical writer.
The red box in Fig. 1 is an area I would like to bring your attention to and more specifically, to where the bridge pickup connects to the 5 way switch and volume pot.
Fig. 2 is a "blow up" of this area. The problem with DiMarzio's schematic is that the red and green wires are reversed. I have indicated the "reversed" wires with blue arrows.
If this is wired up per DiMarzio's instructions, the bridge pickup will not work at all. I suspected something was wrong with DiMarzio's diagram and my suspicions were confirmed when I had an electronics guy check it out for me.
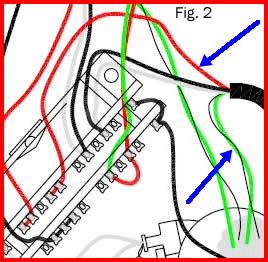
Connected per DiMarzio's instructions, the bridge pickup will not work with the 5-way switch in either position 4 or 5.
To correctly wire this up, the green wire goes to the 5-way switch and red wire is grounded to the volume pot housing. The "ass-backwards" red and green wires threw me off and caused a lot of experimenting where none was needed had the schematic been correct.
I am considering writing a letter to DiMarzio regarding this incorrect schematic. Maybe I can save some other chump out there some aggravation.
Crispy
Wednesday, March 15, 2006
The Final Product
 The Stagemaster is finished, and here it is. Isn't she beautiful? I had time today to put it all back together and I'm happy to say it went off without a hitch--which is not to say that there wasn't a final hitch regarding the electronics. But please allow me to describe the bad parts in a later post.
What I would like to do today is enjoy the moment. The Stagemaster is back together and it sounds . . . well, it sounds like I hoped it would. What more could I ask for, really? I expected and hoped it would sound a certain way, and it has exceeded my expectations.
The new DiMarzio pickups sound sublimely beautiful singly, and in combination with one another. The neck position pickup is a powerhouse with a huge, big fat sound and the single coil in the middle position is as clean sounding of a pickup that I have ever heard.
But the main feature, it turns out, is the f-spaced pickup in the bridge position. This is an ass-kicking pickup that almost sounds like it has an overdrive built in. The power is indescribable.
And finally, the shielding. Going to the trouble of shielding the electronics properly has paid off in a big way. I have never owned a guitar, until now, that is completely noise free. No hum, no buzz no nothing. Complete, beautiful silence.
So what is left to do? Nothing as far as the Stagemaster goes, but what I would like to do for you is to summarize the project in the next series of posts. There were several mystifying developments at the end of the project which you should be aware of if you try something like this on your own. I will describe these to you in detail.
I would also like to summarize what this project cost. I have a feeling that it may have cost more than the guitar itself cost, but we'll see. I haven't added it up yet.
But for now, the Stagemaster is done and I am enjoying my "new" guitar.
Crispy
Friday, March 10, 2006
Big News!
A lot of new news coming soon regarding the Stagemaster project. DiMarzio's wiring diagram is wrong! Wrong I tell you! More on this soon.
Crispy!
Crispy!
Saturday, March 04, 2006
Galactic Purple on eBay
 I'm not a huge fan of the color purple, but look what I found for sale on eBay. It is the Galactic Purple version of the Stagemaster and there are some good photos of it on eBay, just click on the photo to go to the sale (sale expired, link removed). Now this is purple!
Please note that it is described on eBay as a "Squire Stagemaster Stratocaster by Fender," which is incorrect. For one, it is not a Stratocaster at all, and Squier is misspelled.
I would like to know where they got that hardshell case. I may have to drop them a line.
Crispy
The Work Continues
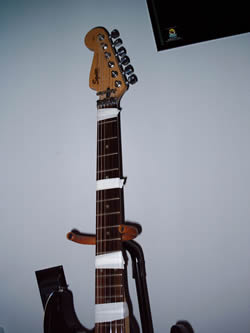 I finally had some time this morning to take the Stagemaster back apart. I didn't want to trash the brand new set of strings I put on so I had to figure out a way to avoid taking them completely off, and this is what I came up with.
All I did was unlock the "locking nut" and loosened the strings until they were real baggy. Then I taped them to the neck with some masking tape as shown where they would stay put and not get bent up. Then it was a simple matter of releasing the strings from the Floyd Rose bridge.
I removed the pickguard again, for the umpteenth time, and unsoldered all of the connections to the two 250k pots and installed the Gibson 500k pots that I bought earlier. I had to ream out the holes in the pickguard just a tad to get the Gibson pots to fit, but they are now mounted on the pickguard.
That's about as far as I got today. All I have to do is reconnect everything to the new pots and I should be finally good to go (crossing fingers). Unfortunately, this is no small job. There is a lot of soldering and reconnecting still to be done.
Crispy
Tuesday, February 28, 2006
Galactic Purple
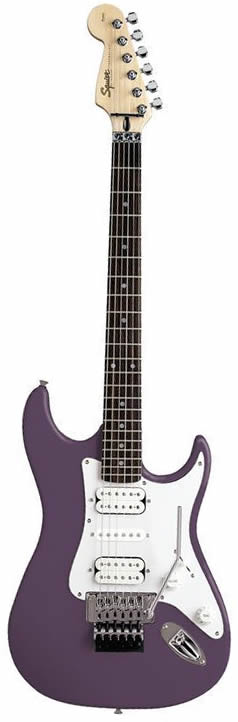 Not much to report on the project right now. I've been very busy with work lately and have not had the time to take the Stagemaster back apart and swap out the pots. I am hoping to have some time maybe this afternoon or tomorrow perhaps. I am anxious to get on with this and get the guitar back in order.
On another topic though, I found a photo of a "Galactic Purple" HSH Stagemaster. Along with the Arctic White one, I've never actually seen a purple one in real life. I don't know if the color is accurately represented in this photo or not, but I think not. For some reason, I got the impression that "Galactic Purple" would be more purple than this. Anyone ever seen a purple one?
Crispy
Friday, February 24, 2006
I Hate Electronics!
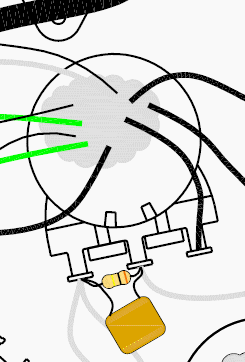 Please take a look at the image to the left. This is, according to DiMarzio, how the volume pot in my "hum-canceling" pickup configuration should be wired up. They recommend 500K pots and a capacitor and resistor on the volume pot lugs as pictured. The recommended values for the capacitor and resistor are 560 pf and 300K respectively. The capacitor and resistor, according to DiMarzio, are optional and only serve to "restore the treble response that is sometimes lost when the volume control is turned down."
Well, I didn't use 500K pots, nor did I install the "optional" capacitor and resistor. This, apparently, was a mistake on my part because the Stagemaster does not sound the way I expected it to sound. The sound is unacceptable, so the Stagemaster has to come apart again.
So here is where I get confused. While DiMarzio recommends specific capacitor and resistor values (see above) for this set up, these values, come to find out are widely argued amongst people who know a lot more about guitar electronics than I ever will. These values aren't chiseled in stone and everyone, it seems, has an opinion on the matter. Some argue that they are a needless headache and shouldn't be used at all and they even offer up alternatives, which I'll get to soon. I will now give you 2 examples of completely differing opinions out of the dozens I found:
Example #1:
This mod will keep the sound a little brighter as you turn down the volume, and it won't get so muddy/muffled. Worth doing, IMHO.
The cap and/or cap- resistor are added between the hot of the volume pot (the terminal connecting to the switch) and the center lugs. The third terminal of the volume pot is ground, and is probably bent over and soldered right to the bottom of the pot.
There are several ways to do this. I've only tried a couple.
a) Cap only.
b) Cap and resistor in parallel. (This is what I have now on my Clapton.)
c) Cap and resistor in series. (I haven't tried this one.)
d) Cap and resistor in series, with another cap in parallel with those. (I haven't tried this one, either.)
The value of your volume pot will determine what values to use here. If your volume pot is a 250K, then I'd recommend starting with example "b" and using a 220K resistor with a 680pf capacitor. Any wattage resistor (1/4 watt is fine) and any rating of cap (50v ceramic disc) is more than OK. For more information go to the websites for Kinman pickups, Acme guitar works, or Seymour Duncan.
If your volume pot is a 500K, then multiply the resistor by two and divide the cap by two. (Approximately 470K resistor and 330pf to 500pf.)
FWIW, on Strats with volume pots of 250K, for the cap only method (a) I have used anywhere from 330pf to 800pf. Try about 500-600pf for starters.
Example #2:
I've used the cap/ resistor method, and another one that's free and works better:
There's a wire that goes from the outside lug of the volume pot to the tone pot. Simply move the wire from the outside lug of the volume pot to the middle lug.
That's it. Try it. I did and found it to be less nasally, more natural sounding, and no screwing with different value caps.
So there you have it, and because I am a huge fan of simplicity, I think I am going to toss the 250K pots and go back to 500K's, and try Example #2 first. The reason for this is that stuffed up and "nasally" sounding is exactly what the Stagemaster has going on right now.
My next step will be to unstring the Stagemaster, take the pickguard back off and try a different set up. I'll keep you up to date.
Crispy
Thursday, February 23, 2006
Houston, we have a problem...
I'm not happy. Well, I strung up the Stagemaster last night just for a test run, plugged her in, and didn't like what I heard. I'm not sure if it is the 250 k pots I used or what, but I don't like the way she sounds. Don't like it at all. It was said that the 250 k pots would produce a slightly warmer tone, but this is a little too warm . . . no, way too warm for my liking. Be prepared for a lengthy read next entry. I have lots to report, a few ideas, a lot of conjecture and personal opinion mixed in with some other people's ideas I've read on the web which may solve the problem.
I only attached the pickguard with 3 screws, but taking the Stagemaster back apart and unstringing this thing is a depressing thought, but I'm afraid it has to be done.
Crispy
P.S. The good news is that tortoise shell looks sweet on gloss black paint. : )
P.P.S. The copper foil shielding works perfectly. The Stagemaster is virtually silent no matter how it is waved around. No static, no hum, no buzz, no microphonics whatsoever.
I only attached the pickguard with 3 screws, but taking the Stagemaster back apart and unstringing this thing is a depressing thought, but I'm afraid it has to be done.
Crispy
P.S. The good news is that tortoise shell looks sweet on gloss black paint. : )
P.P.S. The copper foil shielding works perfectly. The Stagemaster is virtually silent no matter how it is waved around. No static, no hum, no buzz, no microphonics whatsoever.
Wednesday, February 22, 2006
Success!
Today I am happy to report that after installing the new Fender Superswitch I bought, all of the new pickups seem to be working in accordance with the switch settings. All 5 positions are working when the are supposed to be working, and not working when they are not supposed to be working.
I took me at least an hour and a half to uninstall the standard 5-way switch I bought earlier and to install and wire up the new Superswitch. Again, if you are interested in looking at the wiring diagram, click here to view the PDF from DiMarzio. I wired everything up exactly as instructed, and it was no piece of cake.
I do not have an ohm meter (or whatever they're called), so after I loosely attached the pickguard back onto the guitar with a couple of screws, I tested the pickups by plugging the guitar into my amp and tapping on each of the pickups with a small screwdriver. After I moved the switch through all 5 positions and tapping on each pickup respectively, I determined that they are all active when they are supposed to be. According to DiMarzio, this is the reasoning behind a "hum-canceling" configuration such as this:
"One reason the 3-pickup humbucker-single-humbucker setup is popular is because of the Stratlike sound of the 2nd and 4th switch positions. Because these positions utilize 1 coil from the neck or bridge humbucker and the single-coil in the center, they are humcancelling. If there is also a humcancelling pickup like a Virtual Vintage® model in the middle position, it becomes necessary to turn off the bottom coil of the middle pickup as well as one coil from the outside humbucker. This can't be accomplished with a standard 5-way selector switch. The diagram shows how to do this with a multipole 5-way (EP1112). Observe the positioning of the humbuckers: the neck pickup is installed in the opposite direction from the bridge pickup. This was done so that the coil closest to the middle pickup remains on in the 2 & 4 positions. This produces the most "quack". If the humbuckers are turned around, the result is a less hollow, more Tele-like sound."
At this point, all I can tell you is that all of the pickups are working. I won't have any idea of what the Stagemaster actually sounds like until I put it all back together and put some strings on it--which will be the next step.
And regarding strings, this guitar has been jostled around a lot in the course of this mod. I hope to heck it hasn't developed any intonation problems as a result of all of the handling. Intonation problems, I know from experience, can be a real headache.
Not too much longer now . . .
Crispy
I took me at least an hour and a half to uninstall the standard 5-way switch I bought earlier and to install and wire up the new Superswitch. Again, if you are interested in looking at the wiring diagram, click here to view the PDF from DiMarzio. I wired everything up exactly as instructed, and it was no piece of cake.
I do not have an ohm meter (or whatever they're called), so after I loosely attached the pickguard back onto the guitar with a couple of screws, I tested the pickups by plugging the guitar into my amp and tapping on each of the pickups with a small screwdriver. After I moved the switch through all 5 positions and tapping on each pickup respectively, I determined that they are all active when they are supposed to be. According to DiMarzio, this is the reasoning behind a "hum-canceling" configuration such as this:
"One reason the 3-pickup humbucker-single-humbucker setup is popular is because of the Stratlike sound of the 2nd and 4th switch positions. Because these positions utilize 1 coil from the neck or bridge humbucker and the single-coil in the center, they are humcancelling. If there is also a humcancelling pickup like a Virtual Vintage® model in the middle position, it becomes necessary to turn off the bottom coil of the middle pickup as well as one coil from the outside humbucker. This can't be accomplished with a standard 5-way selector switch. The diagram shows how to do this with a multipole 5-way (EP1112). Observe the positioning of the humbuckers: the neck pickup is installed in the opposite direction from the bridge pickup. This was done so that the coil closest to the middle pickup remains on in the 2 & 4 positions. This produces the most "quack". If the humbuckers are turned around, the result is a less hollow, more Tele-like sound."
At this point, all I can tell you is that all of the pickups are working. I won't have any idea of what the Stagemaster actually sounds like until I put it all back together and put some strings on it--which will be the next step.
And regarding strings, this guitar has been jostled around a lot in the course of this mod. I hope to heck it hasn't developed any intonation problems as a result of all of the handling. Intonation problems, I know from experience, can be a real headache.
Not too much longer now . . .
Crispy
Monday, February 20, 2006
Minor Update
I received my Fender Superswitch Saturday so I should be able to continue on with the project very soon. This is the biggest switch I have ever seen for a guitar and I sure hope it fits in the electronics cavity. I haven't actually fitted it yet, but I can see where some guitars might require routing in order to fit this switch. Just eye-balling things the switch looks like it will fit, but before I wire this thing up I will definitely do a test fit. More on this soon.
Crispy
Crispy
Thursday, February 16, 2006
Red Stagemaster on eBay
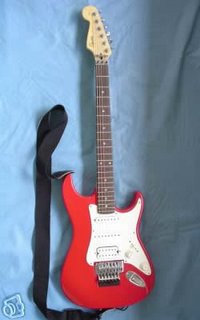 If you are interested, there is a red Stagemaster for sale on eBay right now. The person selling it obviously doesn't know anything about the guitar (or guitars in general for that matter). This Stagemaster certainly isn't one year old. If you are interested in a red HSS, here is your chance. I kind of like the red ones; however, the Arctic White Stagemaster is still my holy grail.
Crispy
P.S. I'm still waiting on the "Superswitch" I ordered last week. Once I get it, I'll continue on the project. And also, this eBay sale is over so I removed the link.
Saturday, February 11, 2006
Stewart-MacDonald
I'm a new fan of the Stewart-MacDonald web site. I hadn't actually heard of these people until I started this project, but they have a remarkable web site that not only has any part you can think of, but what I really like, is they tell you how to use the parts.
Furthermore, the design of their web site is excellent (take it from me, I was in the web design business for almost 10 years). It is easy to navigate and the overall design usability is outstanding. If you are looking for guitar accessories and parts, I highly recommend Stewart-MacDonald. It was reading the descriptions of switches on their web site that finally made it clear to me which switch I needed to finish the Stagemaster project. Bravo, Stewart-MacDonald, bravo!
Crispy
Furthermore, the design of their web site is excellent (take it from me, I was in the web design business for almost 10 years). It is easy to navigate and the overall design usability is outstanding. If you are looking for guitar accessories and parts, I highly recommend Stewart-MacDonald. It was reading the descriptions of switches on their web site that finally made it clear to me which switch I needed to finish the Stagemaster project. Bravo, Stewart-MacDonald, bravo!
Crispy
Switching Gears
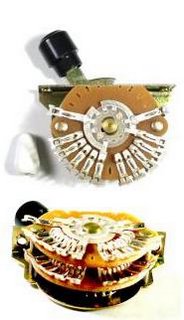 After researching wiring information on the web until about about 1:00 am this morning, I have decided and ordered. In order to achieve this wiring configuration (pdf), I need a 5-way "Superswitch" (pictured left). Not a "Megaswitch" or any other kind of switch, a "Superswitch."
To quote from the Stewart-MacDonald web site:
"Unlike standard 2-pole lever switches, this 4-pole switch has 24 solder lugs, which allows for virtually limitless wiring options."
And because my middle pickup is the 4 conductor type (pdf), this switch is what I need to make the whole thing come together.
The best price I could find on a Superswitch was at GuitarElectronics.com for $17.95, which is a couple of bucks cheaper than anyone else, and it is Fender OEM.
Sheeeesh! And to think that before I ever started this project I had never even heard of a "Superswitch!"
Crispy
Friday, February 10, 2006
Guess what? More on wiring...
Well, I have found out why my current wiring set up doesn't work. It seems that the DiMarizio single coil (YJM) pickup I bought for the middle position is a 4 conductor, hum canceling pickup (pdf). Which isn't a bad thing, but I wasn't planning on the pickup having more than 2 wires. In this case, it has 5 (1 white, 1 black, 1 red, 1 green, 1 ground).
The wiring diagram from DiMarzio that I was trying to use assumed that a standard single coil pickup (2 wires) would be used. Take a look at this diagram (pdf).
As I understand things, if I want to use the new YJM I bought and make it do what I want it to do, I can't use a standard 5 way switch. I have to use a multipole 5-way switch (sometimes called a Megaswitch) that will facilitate the desired, hum-canceling hookup. Please take a look at this diagram (pdf) and you can see how the YJM is hooked up to the switch. Obviously, this setup cannot be accomplished with a standard 5-way switch.
I have found the switch I need at Stewart-McDonald, take a look here. So it looks like I am going to have to order up and wait for it to get here.
If any of you have any input regarding this wiring issue, I'd sure like to hear it.
Crispy
The wiring diagram from DiMarzio that I was trying to use assumed that a standard single coil pickup (2 wires) would be used. Take a look at this diagram (pdf).
As I understand things, if I want to use the new YJM I bought and make it do what I want it to do, I can't use a standard 5 way switch. I have to use a multipole 5-way switch (sometimes called a Megaswitch) that will facilitate the desired, hum-canceling hookup. Please take a look at this diagram (pdf) and you can see how the YJM is hooked up to the switch. Obviously, this setup cannot be accomplished with a standard 5-way switch.
I have found the switch I need at Stewart-McDonald, take a look here. So it looks like I am going to have to order up and wait for it to get here.
If any of you have any input regarding this wiring issue, I'd sure like to hear it.
Crispy
Thursday, February 09, 2006
Wiring Disaster
Sigh . . . the rewiring job has turned into a nightmare. After wiring up the Stagemaster, I loosely attached the pickguard and plugged the guitar in to see if everything was working. I tested the pickups by simply tapping on them to see if they were all working. Wired up like the DiMarzio diagram, nothing happens when the 5 way switch is in position 4 or 5 (or the bottom two positions). It appears like in positions 1, 2 and 3, all of the pickups are on, however. I have checked and rechecked all of the connections and it appears like everything is right, but two positions don't seem to work at all. I don't know if the diagram is wrong or I have a bad 5 way switch. Back to researching . . .
Crispy
Crispy
Wednesday, February 08, 2006
Finished Wiring
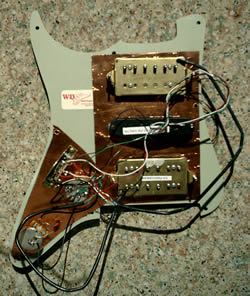 Okay then, with the exception of the 3 wires that are attached to the Stagmaster's body (the ground to the spring bridge and the 2 wires that come from the output jack), the wiring is done. Here is a photo of the finished product.
After I found the wiring diagram on Dimarzio's web site, everything fell into place. Here is the most interesting thing of all, in my opinion (taken from DiMarzio's own wiring diagram):
"Observe the positioning of the humbuckers: the neck pickup is installed in the opposite direction from the bridge pickup. This is done so that the coil closest to the middle pickup remains “on” in the 2 and 4 positions. This produces the most "quack". If the humbuckers are turned around, the result is a less hollow, more Tele-like sound."
So this told me that it does indeed matter which direction the pickups are mounted. It doesn't necessarily affect an individual pickup's sound, but it does affect the overall sound when the 3 pickups are used in combination with each other.
That being the case, I had to remove the bridge pickup and flip it over where it would be opposite of the neck pickup per the instructions. I know it sounds confusing, but it makes sense to me when I think about it.
And finally for today, as nice as the new tortoise shell pickguard is, I discovered to my dismay that none of the screw holes were counter sunk. I hadn't noticed this until today. Luckily I had a counter sinking drill bit that took care of the matter. No big deal, but it was an annoyance.
Crispy
Wiring Woes
Much to my surprise, the wiring diagram for the Stagemaster which I downloaded from the Squier web site, does not match up with the way the guitar is actually wired. Furthermore, the DiMarzio pickups I bought have more wires than that original pickups. The original pickups have 3 wires, red/white/ground. The DiMarzios have 5 wires, red/white/black/green/ground.
If this wasn't confusing enough, the instructions that came with the DiMarzio pickups are not what I would call "user-friendly" at all.
I was totally confused as to how to proceed, so it was necessary to get on the web and do some research. Interestingly enough, I found some completely "user-friendly" wiring diagrams right on the DiMarzio web site--you just have to dig around for them. Why this information isn't included with the pickups is beyond me.
I decided to go with this set up (pdf). This is the diagram and a complete description of the sound that is likely to be achieved. I have now finished the wiring and will post a photo in the next entry.
Crispy
P.S. And come to find out, it DOES matter which way the pickups are facing. More on that later...
If this wasn't confusing enough, the instructions that came with the DiMarzio pickups are not what I would call "user-friendly" at all.
I was totally confused as to how to proceed, so it was necessary to get on the web and do some research. Interestingly enough, I found some completely "user-friendly" wiring diagrams right on the DiMarzio web site--you just have to dig around for them. Why this information isn't included with the pickups is beyond me.
I decided to go with this set up (pdf). This is the diagram and a complete description of the sound that is likely to be achieved. I have now finished the wiring and will post a photo in the next entry.
Crispy
P.S. And come to find out, it DOES matter which way the pickups are facing. More on that later...
Subscribe to:
Posts (Atom)
